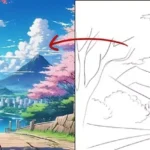
Welcome, dear friends, to a new anime background drawing lesson! Today, we’ll learn how to master anime background shading, a task that often drains time and energy from many artists when designing their scenes. That’s why I’m here to show you my personal process for shading anime backgrounds and webtoons efficiently while still achieving a high level of polish—without spending endless hours on revisions.
This tutorial focuses purely on shading, not coloring. For those interested in coloring anime backgrounds, there are separate lessons available on the website. Ready to draw anime backgrounds like a pro? Let’s get started.
Check Out My Online Store for All Your Art Needs
1. Drawing an Anime Background and Preparing Base Layers
- Open Clip Studio Paint.
- Add the background layer (village coloring layer).
- Add the inking layer above the coloring layer.
- Create a shading layer between the inking and coloring layers.
- Apply a Layer Mask via [Layer] → [Layer Mask].

2. Applying Gradient Shading
Using the Selection Tool, select the exact area you want to shade based on background elements like walls or the ground. Then, use the Gradient Tool with a slightly darker tone selected from the Color Wheel.

This technique creates a smooth anime background shading effect on the visible wall, adding depth and realism. Adjust the gradient angle and opacity to get the desired look—whether you want a soft or sharp shadow depending on your scene’s lighting.

Using the Gradient Tool again, you can build consistent transitions between light and shadow areas. This step is crucial in anime background shading, as it creates a more natural light balance across the background.
Try different gradient angles and tones until the lighting in your scene feels right, for better anime background shading result.

3. Adding Lighting Effects For Anime Background Shading
- Add a new layer above the shading layer.
- Go to [Layer] → [New Correction Layer] → [Brightness/Contrast].
- Reselect the wall using the selection tool.
- Choose a lighter color and apply it with the Gradient Tool for a soft lighting highlight.

4. Adding the Sky and Distant Background
- Create a new layer below the village coloring layer to draw the sky or distant scenery.
- Use the Fill Tool to color the ground with an earthy gradient (dark to light).
- Add basic elements like clouds using the Airbrush Tool with a transparent white color.
- For distant trees, apply light gradients to suggest depth without distracting the eye.

5. Refining Details and Adjusting Colors
- Select the Brush Tool and choose a textured brush to simulate ground cracks.
- Use a dark earthy color to paint cracks, enhancing the ground’s depth.
- Navigate to [Edit] → [Tonal Correction] → [Hue/Saturation/Luminosity] to fine-tune lighting and contrast.
- Repeat with [Color Balance] from the same menu to adjust the overall color palette based on your scene.

Note: When shading anime backgrounds, don’t stress about making everything perfect from the beginning. The key is to experiment freely with lighting and shadows until you find your ideal balance. With practice, you’ll improve your speed without sacrificing quality—and gradually develop your own shading style.
Now your background is ready! Shading is essential for giving depth and dimension to backgrounds, making your scenes feel alive. With gradients and smart lighting, you can turn even the simplest layout into a professional anime-ready backdrop.

Start applying these steps in your next anime project just as I did, and keep practicing until anime background shading becomes second nature. Over time, you’ll build your own artistic approach and master the shading process with speed and precision.
Do you have any other ideas for improving anime background shading? Share your experiences in the comments, and stay tuned for future tutorials on anime background drawing and coloring to level up your skills even more!


Leave a Reply