Hello my friends, today I’m going to explain how to draw long anime hair in a professional yet easy way that you can instantly apply in your own artwork. Anime hair drawing is one of the most beautiful aspects of illustrating anime characters—it brings movement, charm, and liveliness to the character when drawn correctly and neatly. A well-done anime hairstyle can make your character come alive on the canvas and capture attention from the very first glance.
That’s why I’ve prepared this tutorial using a simplified and approachable method, free of unnecessary complications, with clear steps to help everyone draw long hair effortlessly—whether you’re a beginner or someone with experience—while adding your personal touch to your characters.
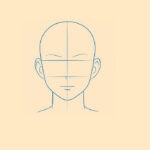
Step One: Drawing the Head
We start by sketching a simple and precise head shape, and determine the face’s orientation. This will help us later in setting the correct direction and flow of the hair strands. In Photoshop or Clip Studio, you can use the Figure Tool > Ellipse to draw the base head circle, then use the Operation Tool to adjust its direction according to the angle you want the character to face.

Step Two: Drawing Guide Lines for Hair Strands in Anime Hair Drawing
We now draw flowing lines or strands starting from the top center of the head and extending outward in multiple directions. These guidelines will help you maintain proper balance while working on your anime hair drawing. You can use the Pencil > Rough Pencil tool to sketch these lines lightly and flexibly.
Don’t forget to consult reference images and observe how long strands of hair fly or fall in different directions—this adds a sense of motion and softness to long anime hairstyles.
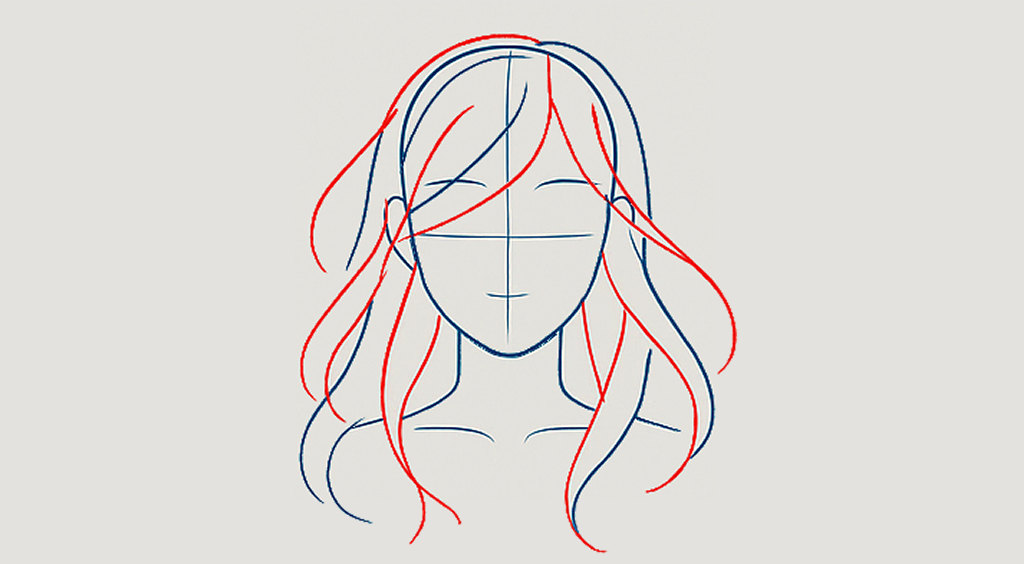
Tip: When you look at references, you’ll notice how strands flow in various directions to make the hair look more natural and dynamic. This detail is extremely important in anime hair drawing, especially when aiming for long and graceful hairstyles that breathe life and flexibility into your character designs.

Check Out My Online Store for All Your Art Needs
Step Three: Drawing the Full Hair Using the Guide Lines
Next, we start drawing the complete hair, relying on the guide lines we previously sketched. Divide the hair into both large and small strands to maintain structure and aesthetics. Leave some space between the locks to show thickness and volume.
In Clip Studio Paint, you can now use the Pen Tool > G-Pen for clean final lines. Zoom in as needed to ensure cleaner detailing in your anime hair drawing.

Step Four: Adding Facial Features and Extra Strands
After the basic hair is drawn, add facial features like the eyes, nose, and mouth in a simplified manner. Then draw additional inner hair strands for more detail. You can even add a few loose strands flowing outward to further emphasize motion and depth in your anime hair drawing.

Step Five: Inking and Coloring
Ink the entire drawing using smooth black lines, ensuring clarity and consistency. Once the ink dries, erase the guidelines using the Eraser Tool.
Start coloring the hair using bright shades. Create a new layer beneath the line art, then use the Fill Tool > Refer Other Layers to quickly fill closed areas.
To add depth, use the Airbrush > Soft tool with a slightly darker shade to draw shadows between strands. For highlights, pick a lighter color and use Airbrush > Highlight to make the hair look shiny and natural in anime style.

Important Notes During Anime Hair Drawing
- Always leave a small gap between the scalp and the start of the hair to show natural volume—hair doesn’t stick directly to the scalp. This is vital for a realistic and thick anime hair drawing.
- When drawing long hair, let the strands follow gravity or gently float to express softness and motion.
- Vary your line thickness when inking to give the hair a dynamic and attractive appearance.

By following these steps to draw long anime hair, you’ll be able to create clean, elegant, and expressive hairstyles while applying your unique artistic flair. You’ll also enjoy the process as your drawing evolves from simple lines into a complete, professional-looking artwork.
Don’t hesitate to experiment with different long hair styles—each attempt will sharpen your skills. With time and practice, you’ll be able to produce stunning anime hair drawing pieces in your own smooth, confident style.
I hope this tutorial has been helpful and given you a fresh step forward in your anime art journey. See you next time with a new lesson full of tools and techniques to help you grow as an artist. Take care, and happy drawing!


Leave a Reply