
Hello dear friends! In this article, I’ll cover a fundamental topic for anyone interested in drawing manga or webtoons: adding tones to manga and webtoons alike—commonly referred to in Arabic as “textures,” especially for clothing. As we know, manga artists rely heavily on adding tones to manga to add detail, depth, and realism to their art without complex manual shading or wasting time.
Whether you’re a beginner or a professional, these steps will help enhance your artwork’s quality. I’ll share all my experience in this field so you can benefit from my journey in drawing manga. As you might know, I’ve completed a manga of six chapters which might be republished—so follow these steps with me.
How to Add Clothing Tones Using Clip Studio Paint
You can select the appropriate tone from the Material > Tone library, where you’ll find plenty of ready-made tones you can drag directly onto your artwork based on the style you want.

Then, add a new layer above your existing layers and apply a Layer Mask to restrict the tone’s appearance only to the character or area you want to color. This ensures that the tone doesn’t bleed outside the drawing boundaries—an essential part of adding tones to manga correctly.

Check Out My Online Store for All Your Art Needs
Next, drag the tone directly onto the character or selected clothing using the Object Tool by clicking and dragging to position the tone. You can adjust the tone’s size and style to fit the look you’re going for.

With the Operation Tool, you can scale up or down after adding tones to manga to better fit the area you’re covering.
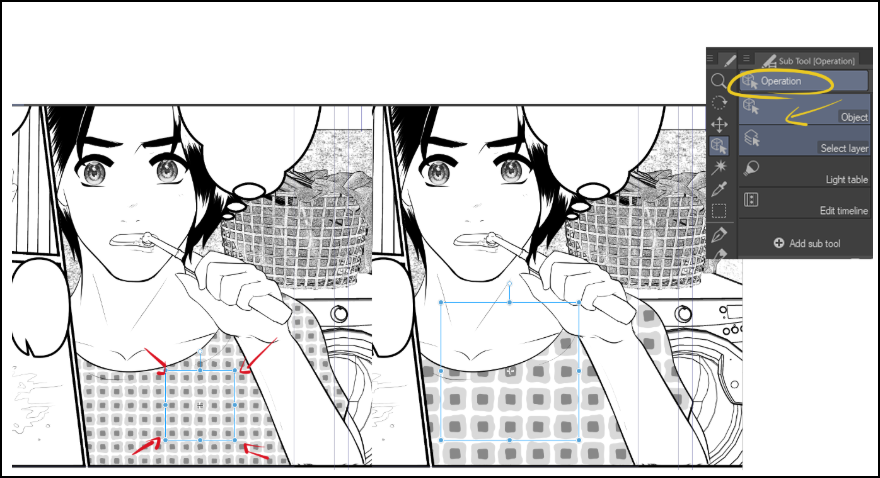
After placing the tone, apply a mask to the tone layer to erase any excess parts outside the clothing boundary.
If the tone is colored, simply convert it to black and white by using the Convert to Gray option from the layer settings—another important feature when adding tones to manga efficiently.

Alternate Method: Using Simple Tone Setting
Another way to apply tones is to first select the clothing and follow these steps:

- Select the clothing layer or manually define a selection with the selection tool.
- From the top menu, choose Layer > Layer Property > Tone.
- In the settings, activate Simple Tone Setting.
- Choose the number of lines, dot size, or tone density.
This method turns the color automatically into a tone, without needing to import files. It’s especially handy when adding tones to manga quickly and uniformly.

Third Method: Using Sub Tool and Spray Brush
There’s also a manual approach using the built-in tone brushes in Clip Studio:
- Select the clothing layer.
- Choose Sub Tool > Spray.
- You’ll find brushes like “Tone Spray” or “Dot Spray” that let you spray tones over your selected area.
Using pen pressure or brush settings, you can control the tone’s density and spread. This is great for special effects or unconventional textures when adding tones to manga.

Why Adding Tones to Manga Is Crucial
Tones aren’t just decorative—they play a crucial role in making clothing look real and believable. Through tones, lighting and shadows are artistically simulated to reflect fabric texture, folds, and wrinkles. This enhances the realism of the scene and increases reader engagement.
Adding tones to manga gives you a consistent way to highlight small details like fabric textures, skin, or backgrounds. Instead of relying completely on manual shading, tones offer a visually balanced level of detail that reduces clutter on the page.

Today we’ve learned the importance of adding tones to manga and how it adds realism and artistic flair to our work—without consuming too much time. As every mangaka knows, time is tight, and we need to optimize every second using easier methods that simplify manga, webtoon, and comic production.
With the right tools in drawing software like Photoshop or Clip Studio Paint, adding tones to manga and webtoons gives us the power to tone clothing, hair, and even backgrounds—like home furniture—resulting in visually rich manga pages that seem labor-intensive, when in reality, we used ready-made textures.
We hope you enjoyed this article, and don’t forget to try out different methods and customize them to your artistic style. See you in future posts.


Leave a Reply